08: electronic output devices
introduction
This page details what I learned with class 8, held on 16 July, 2020. This class focused a lot of electronic output devices. These would come in handy with controlling specific types of outputs for certain inputs which is something quite useful when it comes to designing the final project (especially in my case, as I need to provide very specific outputs for very given and specific inputs).
understanding output devices
In the previous class, we worked with electronic input devices, such as sensors and buttons. During this session, we worked with understanding output devices and how they can be used.
types of output devices
A quick overview of the different types of output devices we can be using from our kit, or in general.
light outputs
The most basic types of outputs that come in our kit (and that exist in general) are light outputs. These typically come in the form of LEDs, and our kit contains visible and IR LEDs as outputs.
sound outputs
Another common output device is a speaker/buzzer, wich will produce a sound output. Our kits come equipped with a simple buzzer as sound output.
motion outputs
There is one final type of output device found in our kit (though there are many other types of output devices found elsewhere), which is the motion output. With this, I refer to motors. We have servo motors and stepper motors in our kit as the simplest.
There are, of course, other types of output devices found elsewhere, with different voltage inputs etc. However, this is what we have in our kit.
With these outputs understood, we are able to work with a few of them. More documentation can be found on Rob's GitHub page.
breakout rooms: working the outputs!
During the breakout rooms, we worked with some of our basic output devices, which would serve as good practice for our assignments (and by extension final projects).
breakout rooms 1: buzzers and leds
With the first session of breakout rooms, we worked with wiring up a buzzer and LEDs to our boards, and make them produce outputs.
the buzzer
We first worked with getting the buzzer to produce a sound. I had to download a bunch of extra libraries, as I had switched to the Huzzah board, which doesn't support a lot of the built-in libraries for many of these outputs that the Metro supports. Eventually, I did end up getting the buzzer to produce an output. I would use the buzzer in my assignment, as I worked more deeply with it and wanted to see just how much I can manipulate it with the simple Huzzah board.
the leds
Next, we quickly made the LEDs light up in a given order. This one was a bit more complicated, but I did get it to work in the end. Similarly with the buzzer, I had to define some of my own functions to make it compatible with the Huzzah, though the code was given, and I had to simply implement it. My project does involve using LEDs (or at least light outputs), so I will continue pursuing them and working as much as I can with them.
A lot of the instructions and documentation for the code and the circuitry used can be found on Nathan's GitHub page. As a note, he wired it up to the Metro, so for the Huzzah, different wiring will be required. Along with this, the separate helper functions defined in the code will also be necessary for the devices to produce the desired outputs.
breakout rooms 2: servo motors
With this session of breakout rooms, we worked with getting the servo motor to work, to better understand motors as output devices.
some trouble with the servo
I ended up having some trouble with the servo motor wiring, which I initially attributed to the board I was using. I tried including extra libraries, wiring in different ways, and even consulting the instructors.
success!
In the end, it turned out that I hadn't grounded properly (the Huzzah is small, so seeing exactly where the pins are is a little difficult). With that working, I finally managed to get my servo motor to move.
quick session on stepper motors
In the final minutes after the breakout rooms (but I will still include that information here), Rob talked about stepper motors, how they work, and how to get them to work. More detailed documentation can be found on his page.
A lot of the instructions and documentation for the code and the circuitry used can (again) be found on Nathan's GitHub page. Once again, he wired it up to the Metro, so for the Huzzah (which I used), different wiring will be required. Fortunately, working the servo motor does not require different coding for the simple functions.
With these basic outputs working, we were ready to start working with the assignment and better understanding these output devices (which would come in handy for our final project).
assignment
For the assignment, I decided to work some more with the buzzer, and wanted to see just how much I could manipulate them. Along with this, I also kept thinking more about my final project, and even started coming up with some basic ideas and designs for how I plan on implemeneting my proposal. Along with that, I also kept on updating some final things with my documentation, so that I would be completely caught up with any of the work that I had either left incomplete or missed entirely.
working with the buzzer
As stated above, the main focus of my work for this week was with the buzzer. I wanted to see just how much I could manipulate it, simply for fun. I have been playing piano for many years, so making music is very fun for me. I wanted to, by extension, just see how much I could do with the simple buzzer.
the plan
I had planned on coding the buzzer to perform Chopin's Nocturne in B flat minor, Opus 9 no 1 (other performances of this piece can be found online, this is one of my favorites).
the challenges
There were a few challenges that I had to face with this assignment (albeit self-imposed) that I felt like I needed to, if not resolve, at least attempt to resolve. The biggest challenges I had to overcome were toggling volume in-piece (for dynamics) and playing multiple notes at once with one buzzer (for chords and intervals). Since I only have access to one buzzer (though that may change in the future), I would only code the right-hand (melody) part.
lab consultation
I planned on getting a lot of those questions answered during a lab section. I consulted Nathan and Victoria, and they both pointed me to other libraries and documentation from other places on the internet. All sources that I looked at and analyzed will be linked and referenced below.
volume toggling
The first issue I wanted to confront and understand (and hopefully try to solve) was volume toggling. The buzzer has a specific volume at which it produces sounds, and being able to produce dynamics with volume toggling was a plan of mine.
going through libraries
After the lab consultation, Nathan and Victoria posted to an old student's documentation page for 8-bit volume control. He implemented an independent library to produce a togglable speaker. His page is available here, and the documentation for the library implemented there is available here. There were some other libraries I scrolled through, but unfortunetely, none of them compiled with my Huzzah board. I even tried lying about the board I was using (inputting Metro) to see if it even compiled, but ended up getting an extremely long error message.
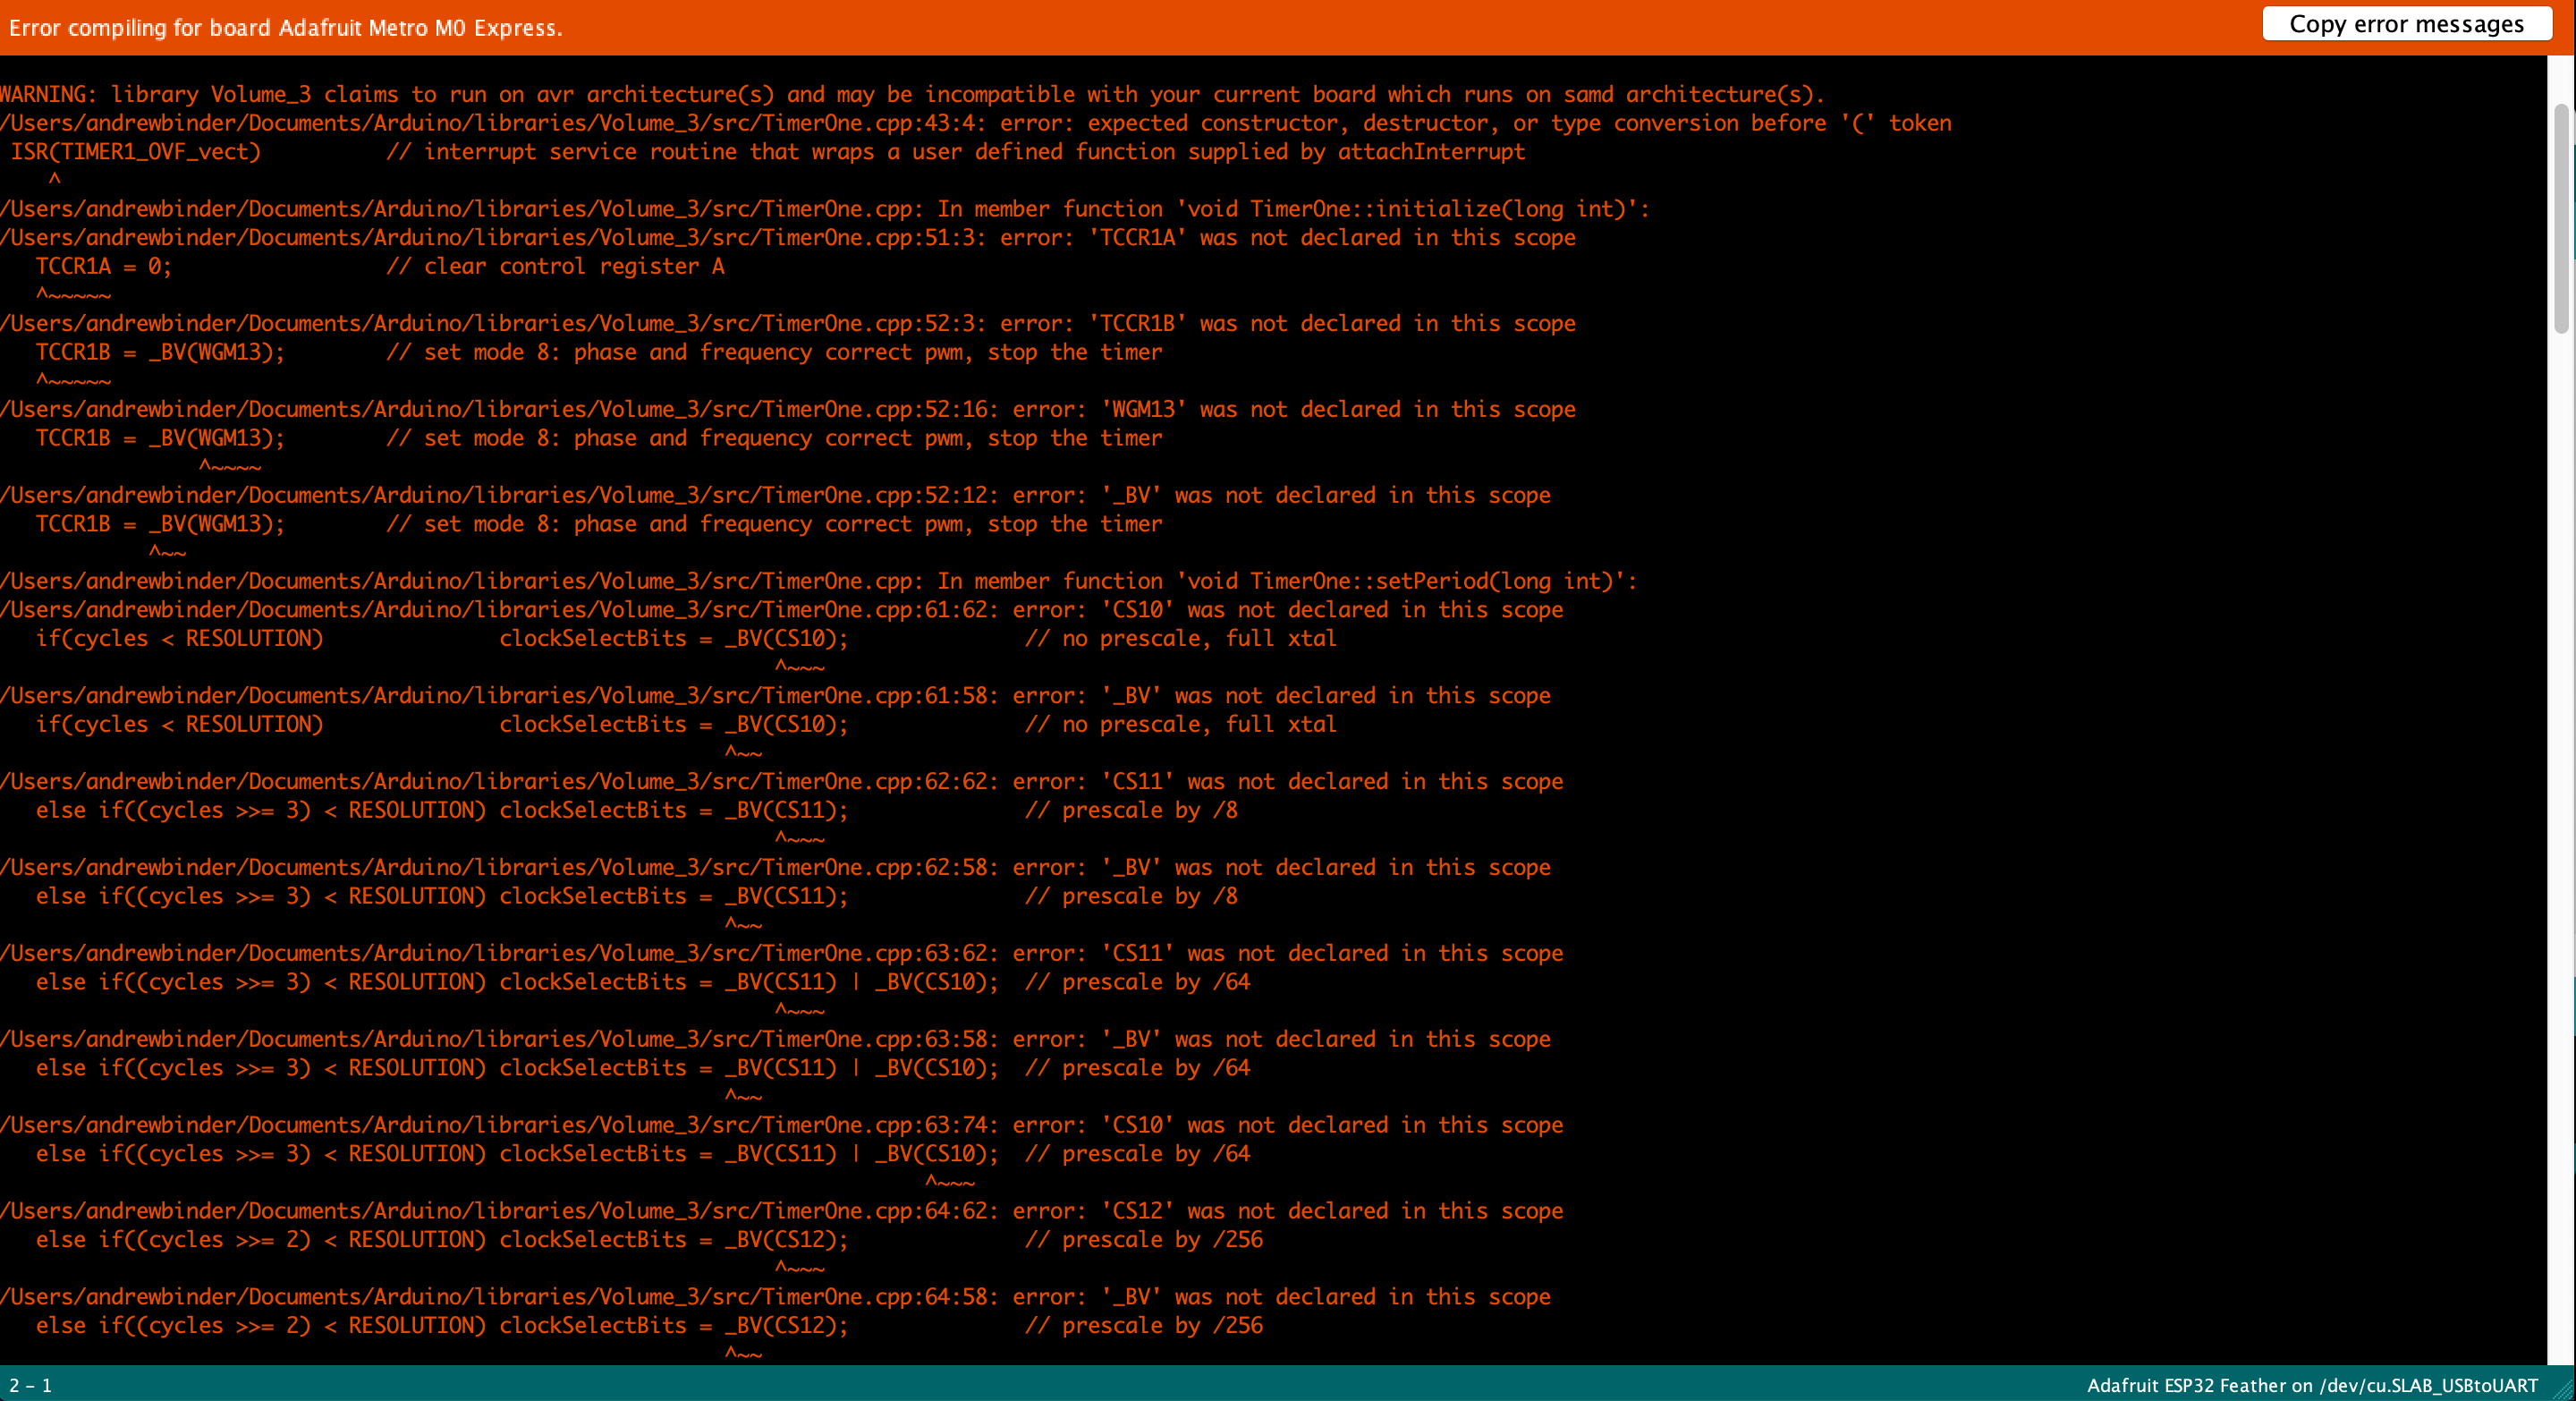
It then came time to try to understand what this error message meant.
samd incompatibility
After some more examination of the error message, we finally isolated the problem: all of the libraries used with the volume toggling were only compatible with AVR architecture, found in older Arduino board models. The boards we use in class, however, use SAMD architecture, and the libraries are currently not compatible with SAMD architecture. The only option I had left was creating my own library, which I decided not to do. I instead decided to just abandon this, though I did learn a lot about how volume toggling would even work.

Even though I had failed to get the volume to toggle, I learned a lot about AVR, SAMD, and volume toggling with a buzzer.
playing two notes at once
The next challenge I wanted to face and understand better was to try to see if I could play two notes at once. This one proved a much simpler problem to solve (or well, not solve in this instance), because it is flat-out impossible to play two notes at once with one simple buzzer, as the tone() function (or for the Huzzah, the helper function defined as myTone() that works the exact same way, just without the preinstalled package) runs with a timer, and one note will run for the duration of that timer. For a Huzzah board and a Metro board, this means that only one note at a time can be played with a single buzzer. Since I don't have access to a second buzzer, I would have to make do with this fact.
the conclusions
Even though neither of my problems ended up getting solved, I did learn a lot about the way a buzzer works, which technically was the goal of this assignment. I decided instead to just code the melody of the right hand, ignoring chords when they came. Funnily enough, ignoring chords for this particular piece was no problem, as most of the chords are simply octaves, so the piece doesn't sound dramatically different from the original.
In the end, I had learned a lot about the limitations of the buzzer and of the board(s) that I used. Hopefully some of these problems can be resolved soon, so that I could code the piece in its entirety (left-hand part included).
the results
Using what I have learned, I decided to settle for coding just the melody in the right hand for the Chopin piece.
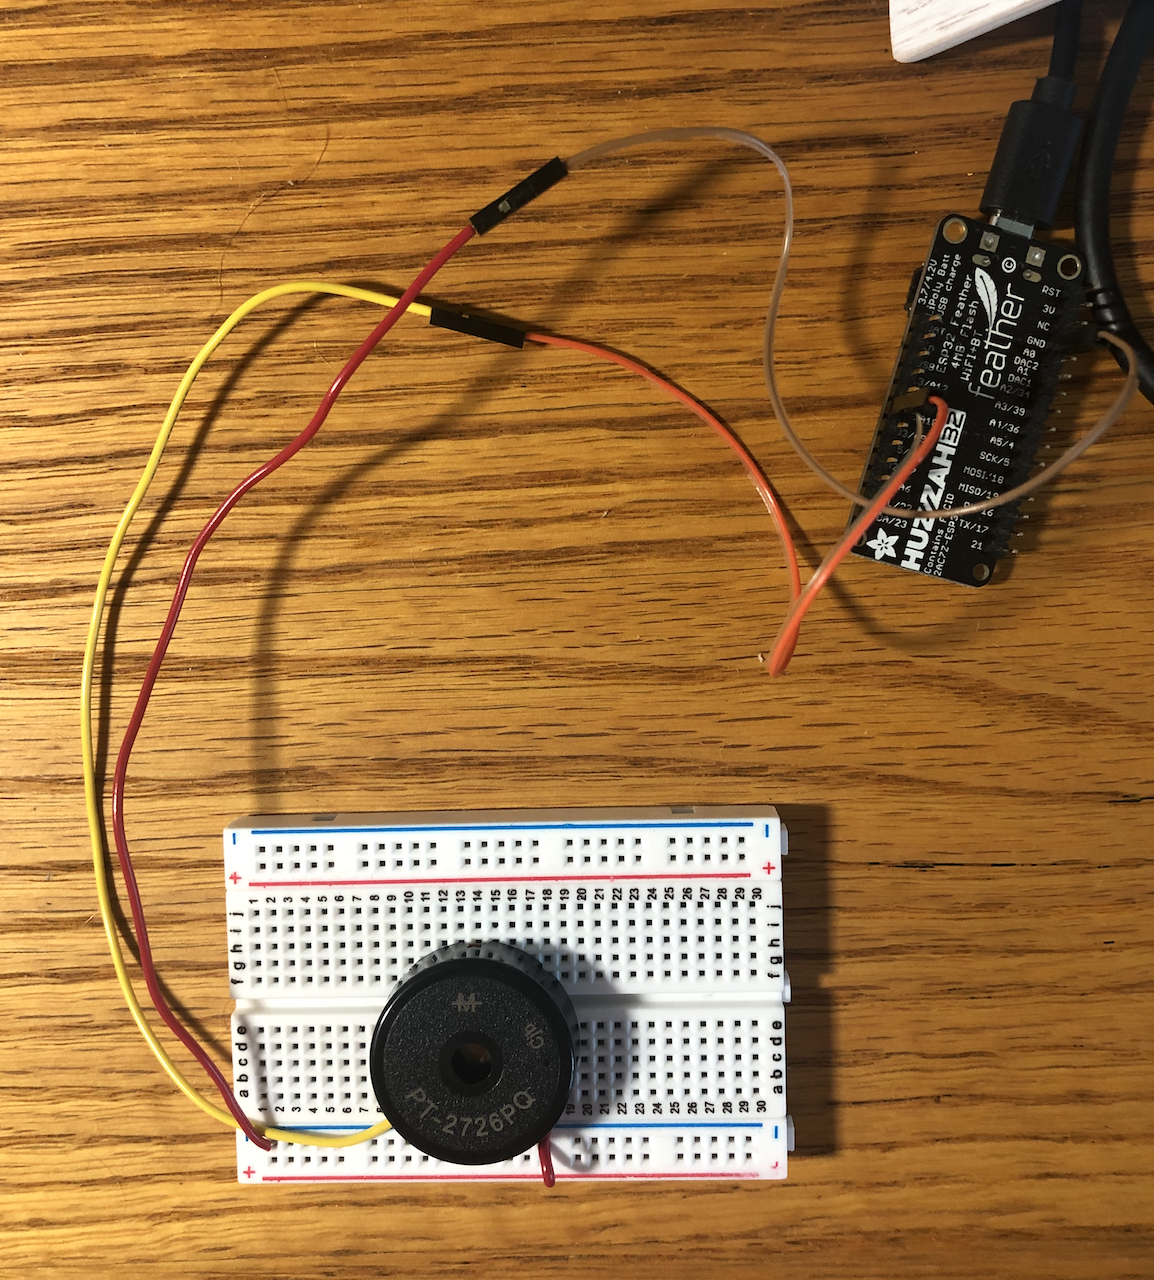
the circuit
I kept the simplistic design and wiring of the circuit that we came up with in our breakout rooms and the one that was documented on Nathan's page. I didn't want to make any modifications, as that wasn't the goal of my exercise or assignment.
the code
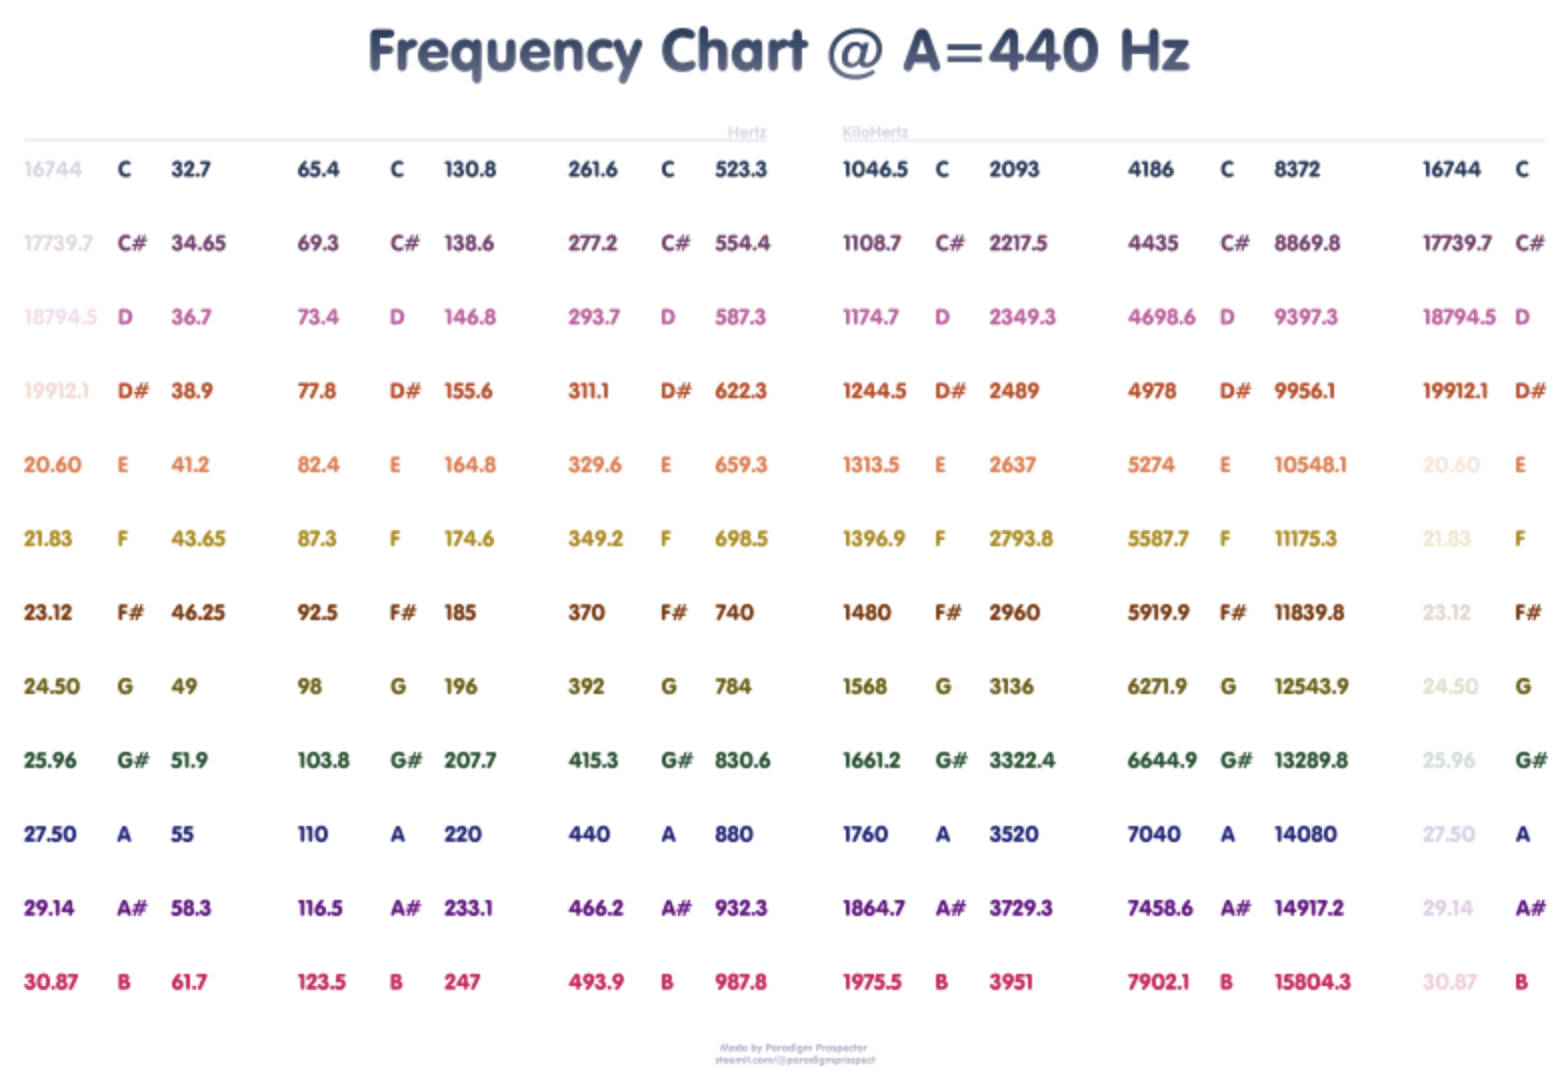
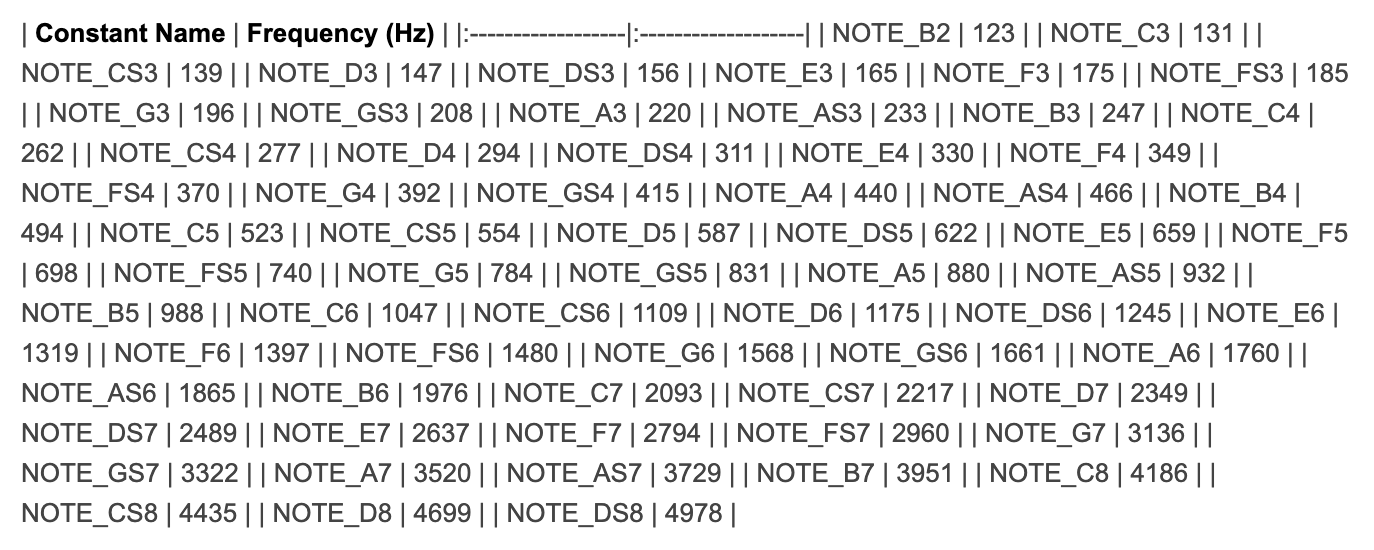
To make my life (and the life of anybody who wants to replicate my experiment and try it with a different piece) simpler, I decided to code separate helper methods for every single note on the piano (or well, almost). I looked up a frequency chart (well actually several, for reference), photos of which are shown here, to code each note from B2 to B7 on the piano (covering 6 octaves, and most of the notes, especially and specifically those used in the piece).
The basic structure of the code was simple. I used the myTone() function defined for Huzzah (you can use the predefined tone() function for boards that support that) and defined all the notes depending on the frequency. I also included duration (as in the function), but also included delayTime in between notes, to simulate different types of rests in music. The basic structure of one note definition is as follows:
                    void NOTE(int pin, int duration, int delayTime, int octave){
                      // play note with specific frequency, depending on octave parameter
                      if     (octave == 3){myTone(pin, freq3, duration);}
                      else if(octave == 4){myTone(pin, freq4, duration);}
                      else if(octave == 5){myTone(pin, freq5, duration);}
                      else if(octave == 6){myTone(pin, freq6, duration);}
                      else if(octave == 7){myTone(pin, freq7, duration);}
                      delay(delayTime);
                    }
This plays the defined note for the given duration, and then pauses for a given amount of time. NOTE, in my code, since sharps and flats can refer to the same note, I first name the sharp note, then the flat. For example, to define a B flat (otherwise known as an A sharp), I will write it as ASBF, to symbolize A sharp/B flat. I defined with conditionals for each octave, so that I could group each corresponding note together, and simply define separate frequencies, depending on what the octave number is. This saves a lot of space and time coding-wise, as I no longer have to define 88 different functions, but rather just 12. The full code for all of the notes can be found below.
                    /* ===============================================================
                    // NOTE DEFINITIONS (FOR SIMPLICITY) -- FROM B2 TO B7 //
                    // NOTE: MUST ADD note FOR F, AS THAT IS DIFFERENT FUNCTION
                    // =============================================================== */
                    // define C3-C8
                    void C(int pin, int duration, int delayTime, int octave){
                      if     (octave == 3){myTone(pin, 131, duration);}
                      else if(octave == 4){myTone(pin, 262, duration);}
                      else if(octave == 5){myTone(pin, 523, duration);}
                      else if(octave == 6){myTone(pin, 1047, duration);}
                      else if(octave == 7){myTone(pin, 2093, duration);}
                      else if(octave == 8){myTone(pin, 4186, duration);}
                      delay(delayTime);
                    }
                    // define CSDF3-CSDF8
                    void CSDF(int pin, int duration, int delayTime, int octave){
                      if     (octave == 3){myTone(pin, 139, duration);}
                      else if(octave == 4){myTone(pin, 277, duration);}
                      else if(octave == 5){myTone(pin, 554, duration);}
                      else if(octave == 6){myTone(pin, 1109, duration);}
                      else if(octave == 7){myTone(pin, 2217, duration);}
                      else if(octave == 8){myTone(pin, 4435, duration);}
                      delay(delayTime);
                    }
                    // define D3-D8
                    void D(int pin, int duration, int delayTime, int octave){
                      if     (octave == 3){myTone(pin, 147, duration);}
                      else if(octave == 4){myTone(pin, 294, duration);}
                      else if(octave == 5){myTone(pin, 587, duration);}
                      else if(octave == 6){myTone(pin, 1175, duration);}
                      else if(octave == 7){myTone(pin, 2349, duration);}
                      else if(octave == 8){myTone(pin, 4699, duration);}
                      delay(delayTime);
                    }
                    // define DSEF3-DSEF8
                    void DSEF(int pin, int duration, int delayTime, int octave){
                      if     (octave == 3){myTone(pin, 156, duration);}
                      else if(octave == 4){myTone(pin, 311, duration);}
                      else if(octave == 5){myTone(pin, 622, duration);}
                      else if(octave == 6){myTone(pin, 1245, duration);}
                      else if(octave == 7){myTone(pin, 2489, duration);}
                      else if(octave == 8){myTone(pin, 4978, duration);}
                      delay(delayTime);
                    }
                    // define E3-E8
                    void E(int pin, int duration, int delayTime, int octave){
                      if     (octave == 3){myTone(pin, 165, duration);}
                      else if(octave == 4){myTone(pin, 330, duration);}
                      else if(octave == 5){myTone(pin, 659, duration);}
                      else if(octave == 6){myTone(pin, 1319, duration);}
                      else if(octave == 7){myTone(pin, 2637, duration);}
                      else if(octave == 8){myTone(pin, 5274, duration);}
                      delay(delayTime);
                    }
                    // define F3-F8
                    void Fnote(int pin, int duration, int delayTime, int octave){
                      if     (octave == 3){myTone(pin, 175, duration);}
                      else if(octave == 4){myTone(pin, 349, duration);}
                      else if(octave == 5){myTone(pin, 698, duration);}
                      else if(octave == 6){myTone(pin, 1397, duration);}
                      else if(octave == 7){myTone(pin, 2794, duration);}
                      else if(octave == 8){myTone(pin, 5588, duration);}
                      delay(delayTime);
                    }
                    // define FSGF3-FSGF8
                    void FSGF(int pin, int duration, int delayTime, int octave){
                      if     (octave == 3){myTone(pin, 185, duration);}
                      else if(octave == 4){myTone(pin, 370, duration);}
                      else if(octave == 5){myTone(pin, 740, duration);}
                      else if(octave == 6){myTone(pin, 1480, duration);}
                      else if(octave == 7){myTone(pin, 2960, duration);}
                      else if(octave == 8){myTone(pin, 5920, duration);}
                      delay(delayTime);
                    }
                    // define G3-G8
                    void G(int pin, int duration, int delayTime, int octave){
                      if     (octave == 3){myTone(pin, 196, duration);}
                      else if(octave == 4){myTone(pin, 392, duration);}
                      else if(octave == 5){myTone(pin, 784, duration);}
                      else if(octave == 6){myTone(pin, 1568, duration);}
                      else if(octave == 7){myTone(pin, 3136, duration);}
                      else if(octave == 8){myTone(pin, 6272, duration);}
                      delay(delayTime);
                    }
                    // define GSAF3-GSAF8
                    void GSAF(int pin, int duration, int delayTime, int octave){
                      if     (octave == 3){myTone(pin, 208, duration);}
                      else if(octave == 4){myTone(pin, 415, duration);}
                      else if(octave == 5){myTone(pin, 831, duration);}
                      else if(octave == 6){myTone(pin, 1661, duration);}
                      else if(octave == 7){myTone(pin, 3322, duration);}
                      else if(octave == 8){myTone(pin, 6645, duration);}
                      delay(delayTime);
                    }
                    // define A3-A8
                    void A(int pin, int duration, int delayTime, int octave){
                      if     (octave == 3){myTone(pin, 220, duration);}
                      else if(octave == 4){myTone(pin, 440, duration);}
                      else if(octave == 5){myTone(pin, 880, duration);}
                      else if(octave == 6){myTone(pin, 1760, duration);}
                      else if(octave == 7){myTone(pin, 3520, duration);}
                      else if(octave == 8){myTone(pin, 7040, duration);}
                      delay(delayTime);
                    }
                    // define ASBF3-ASBF8
                    void ASBF(int pin, int duration, int delayTime, int octave){
                      if     (octave == 3){myTone(pin, 233, duration);}
                      else if(octave == 4){myTone(pin, 466, duration);}
                      else if(octave == 5){myTone(pin, 932, duration);}
                      else if(octave == 6){myTone(pin, 1865, duration);}
                      else if(octave == 7){myTone(pin, 3729, duration);}
                      else if(octave == 8){myTone(pin, 7459, duration);}
                      delay(delayTime);
                    }
                    // define B2-B8
                    void B(int pin, int duration, int delayTime, int octave){
                      if     (octave == 2){myTone(pin, 123, duration);}
                      else if(octave == 3){myTone(pin, 247, duration);}
                      else if(octave == 4){myTone(pin, 494, duration);}
                      else if(octave == 5){myTone(pin, 988, duration);}
                      else if(octave == 6){myTone(pin, 1976, duration);}
                      else if(octave == 7){myTone(pin, 3951, duration);}
                      else if(octave == 8){myTone(pin, 7902, duration);}
                      delay(delayTime);
                    }
                    // ================================================================ //
It may be a lot of writing, but now I can easily tell the buzzer to play any note for any duration with any delay time. For example, if I want to play a long F7 with a long delay, all I need to write in my loop() method is F7(buzzerPin, 700, 1000); which saves a lot of time and energy, and makes the main method much nicer to look at and comprehend.
And so, the entirety of the code for the Chopin nocturne (right-hand melody), at least as far as I've gotten, is below.
                    void loop() {
                      ASBF(buzzerPin, 300, 50, 6);
                      C(buzzerPin, 300, 50, 7);
                      CSDF(buzzerPin, 300, 50, 7);
                      A(buzzerPin, 300, 50, 6);
                      ASBF(buzzerPin, 300, 50, 6);
                      FSGF(buzzerPin, 300, 50, 6);
                      Fnote(buzzerPin, 700, 70, 6);
                      Fnote(buzzerPin, 700, 70, 6);
                      Fnote(buzzerPin, 700, 70, 6);
                      Fnote(buzzerPin, 700, 70, 6);
                      FSGF(buzzerPin, 300, 50, 6);
                      Fnote(buzzerPin, 300, 50, 6);
                      DSEF(buzzerPin, 300, 50, 6);
                      C(buzzerPin, 300, 50, 6);
                      CSDF(buzzerPin, 1300, 70, 6);
                      ASBF(buzzerPin, 500, 250, 5);
                      //--//
                      ASBF(buzzerPin, 150, 20, 6);
                      C(buzzerPin, 150, 20, 7);
                      CSDF(buzzerPin, 150, 20, 7);
                      A(buzzerPin, 150, 20, 6);
                      ASBF(buzzerPin, 150, 20, 6);
                      A(buzzerPin, 150, 20, 6);
                      GSAF(buzzerPin, 150, 20, 6);
                      A(buzzerPin, 150, 20, 6);
                      C(buzzerPin, 150, 20, 7);
                      ASBF(buzzerPin, 150, 20, 6);
                      FSGF(buzzerPin, 150, 20, 6);
                      Fnote(buzzerPin, 150, 20, 6);
                      FSGF(buzzerPin, 150, 20, 6);
                      E(buzzerPin, 150, 20, 6);
                      Fnote(buzzerPin, 150, 20, 6);
                      ASBF(buzzerPin, 150, 20, 6);
                      A(buzzerPin, 150, 20, 6);
                      GSAF(buzzerPin, 150, 20, 6);
                      G(buzzerPin, 150, 20, 6);
                      FSGF(buzzerPin, 150, 20, 6);
                      Fnote(buzzerPin, 150, 20, 6);
                      E(buzzerPin, 150, 20, 6);
                      DSEF(buzzerPin, 150, 20, 6);
                      D(buzzerPin, 150, 20, 6);
                      CSDF(buzzerPin, 150, 20, 6);
                      C(buzzerPin, 150, 20, 6);
                      CSDF(buzzerPin, 150, 20, 6);
                      C(buzzerPin, 150, 20, 6);
                      B(buzzerPin, 150, 20, 5);
                      C(buzzerPin, 150, 20, 6);
                      Fnote(buzzerPin, 150, 20, 6);
                      E(buzzerPin, 150, 20, 6);
                      DSEF(buzzerPin, 150, 50, 6);
                      CSDF(buzzerPin, 1300, 70, 6);
                      ASBF(buzzerPin, 700, 100, 5);
                      //--//
                      ASBF(buzzerPin, 700, 70, 6);
                      ASBF(buzzerPin, 700, 70, 6);
                      ASBF(buzzerPin, 700, 70, 6);
                      GSAF(buzzerPin, 1900, 100, 6);
                      CSDF(buzzerPin, 700, 50, 6);
                      ASBF(buzzerPin, 300, 50, 5);
                      C(buzzerPin, 300, 50, 6);
                      CSDF(buzzerPin, 300, 50, 6);
                      FSGF(buzzerPin, 300, 50, 6);
                      Fnote(buzzerPin, 1500, 100, 6);
                      DSEF(buzzerPin, 700, 50, 6);
                      Fnote(buzzerPin, 300, 50, 6);
                      DSEF(buzzerPin, 300, 50, 6);
                      CSDF(buzzerPin, 300, 50, 6);
                      A(buzzerPin, 300, 50, 5);
                      GSAF(buzzerPin, 1500, 50, 5);
                      CSDF(buzzerPin, 700, 50, 6);
                      DSEF(buzzerPin, 700, 50, 6);
                      Fnote(buzzerPin, 300, 50, 6);
                      DSEF(buzzerPin, 300, 50, 6);
                      CSDF(buzzerPin, 300, 50, 6);
                      DSEF(buzzerPin, 300, 50, 6);
                      Fnote(buzzerPin, 1300, 100, 6);
                      //--//
                      ASBF(buzzerPin, 300, 50, 6);
                      C(buzzerPin, 300, 50, 7);
                      CSDF(buzzerPin, 300, 50, 7);
                      A(buzzerPin, 300, 30, 6);
                      C(buzzerPin, 100, 20, 7);
                      ASBF(buzzerPin, 300, 50, 6);
                      FSGF(buzzerPin, 300, 50, 6);
                      Fnote(buzzerPin, 700, 70, 6);
                      Fnote(buzzerPin, 700, 70, 6);
                      Fnote(buzzerPin, 700, 70, 6);
                      Fnote(buzzerPin, 700, 70, 6);
                      FSGF(buzzerPin, 300, 50, 6);
                      Fnote(buzzerPin, 300, 50, 6);
                      DSEF(buzzerPin, 300, 50, 6);
                      C(buzzerPin, 300, 50, 6);
                      CSDF(buzzerPin, 1300, 70, 6);
                      ASBF(buzzerPin, 500, 250, 5);
                      //--//
                      ASBF(buzzerPin, 150, 20, 6);
                      C(buzzerPin, 150, 20, 7);
                      CSDF(buzzerPin, 150, 20, 7);
                      A(buzzerPin, 150, 20, 6);
                      ASBF(buzzerPin, 150, 20, 6);
                      A(buzzerPin, 150, 20, 6);
                      GSAF(buzzerPin, 150, 20, 6);
                      A(buzzerPin, 150, 20, 6);
                      C(buzzerPin, 150, 20, 7);
                      ASBF(buzzerPin, 150, 20, 6);
                      FSGF(buzzerPin, 150, 20, 6);
                      Fnote(buzzerPin, 150, 20, 6);
                      Fnote(buzzerPin, 150, 20, 8);
                      E(buzzerPin, 150, 20, 8);
                      DSEF(buzzerPin, 150, 20, 8);
                      CSDF(buzzerPin, 150, 20, 8);
                      C(buzzerPin, 150, 20, 8);
                      ASBF(buzzerPin, 150, 20, 7);
                      FSGF(buzzerPin, 150, 20, 7);
                      Fnote(buzzerPin, 150, 20, 7);
                      E(buzzerPin, 150, 20, 7);
                      DSEF(buzzerPin, 150, 20, 7);
                      CSDF(buzzerPin, 150, 20, 7);
                      C(buzzerPin, 150, 20, 7);
                      ASBF(buzzerPin, 150, 20, 6);
                      A(buzzerPin, 150, 20, 6);
                      FSGF(buzzerPin, 150, 20, 6);
                      Fnote(buzzerPin, 150, 20, 6);
                      C(buzzerPin, 150, 20, 6);
                      CSDF(buzzerPin, 1300, 70, 6);
                      ASBF(buzzerPin, 700, 150, 5);
                      //--//
                      ASBF(buzzerPin, 700, 50, 6);
                      ASBF(buzzerPin, 700, 50, 6);
                      ASBF(buzzerPin, 700, 50, 6);
                      ASBF(buzzerPin, 1300, 100, 6);
                      D(buzzerPin, 900, 20, 6);
                      DSEF(buzzerPin, 70, 15, 6);
                      Fnote(buzzerPin, 70, 15, 6);
                      DSEF(buzzerPin, 70, 15, 6);
                      Fnote(buzzerPin, 70, 15, 6);
                      DSEF(buzzerPin, 70, 15, 6);
                      Fnote(buzzerPin, 70, 15, 6);
                      DSEF(buzzerPin, 70, 15, 6);
                      Fnote(buzzerPin, 70, 15, 6);
                      DSEF(buzzerPin, 300, 50, 6);
                      D(buzzerPin, 300, 50, 6);
                      DSEF(buzzerPin, 300, 50, 6);
                      FSGF(buzzerPin, 500, 20, 6);
                      Fnote(buzzerPin, 250, 20, 6);
                      Fnote(buzzerPin, 1500, 70, 6);
                      E(buzzerPin, 300, 50, 6);
                      Fnote(buzzerPin, 70, 15, 6);
                      FSGF(buzzerPin, 70, 15, 6);
                      Fnote(buzzerPin, 200, 50, 6);
                      E(buzzerPin, 200, 50, 6);
                      Fnote(buzzerPin, 200, 50, 6);
                      G(buzzerPin, 200, 50, 6);
                      A(buzzerPin, 200, 50, 6);
                      ASBF(buzzerPin, 200, 50, 6);
                      C(buzzerPin, 200, 50, 7);
                      CSDF(buzzerPin, 1300, 70, 7);
                      //--//
                      ASBF(buzzerPin, 200, 50, 6);
                      FSGF(buzzerPin, 200, 50, 6);
                      ASBF(buzzerPin, 200, 50, 5);
                      CSDF(buzzerPin, 1300, 70, 6);
                      C(buzzerPin, 500, 20, 6);
                      ASBF(buzzerPin, 70, 15, 5);
                      Fnote(buzzerPin, 1300, 70, 7);
                      CSDF(buzzerPin, 200, 50, 7);
                      ASBF(buzzerPin, 200, 50, 6);
                      ASBF(buzzerPin, 200, 50, 5);
                      CSDF(buzzerPin, 1300, 70, 6);
                      C(buzzerPin, 500, 20, 6);
                      ASBF(buzzerPin, 70, 15, 6);
                      CSDF(buzzerPin, 1700, 50, 8);
                      ASBF(buzzerPin, 200, 50, 7);
                      FSGF(buzzerPin, 200, 50, 7);
                      CSDF(buzzerPin, 200, 50, 7);
                      ASBF(buzzerPin, 200, 50, 6);
                      ASBF(buzzerPin, 200, 50, 5);
                      B(buzzerPin, 1300, 70, 5);
                      A(buzzerPin, 700, 70, 5);
                      ASBF(buzzerPin, 2000, 10000, 5);
                    }
in action
Here, I have embedded a video of the buzzer in action. If the embedded video doesn't work, here is the link to the unlisted video on YouTube.
With a little bit more editing, the entire piece should be complete in a little bit. Working out the timing is the most annoying part, aside from making sure I didn't miss any notes (I am using my sheet music to record all of the notes).
Though the results were not exactly what I wanted, they were the best I could've asked for with my current technology. I will continue to work on this and improve it with more resources, and who know; maybe eventually it will sound like a regular piano piece.
some more thoughts
This was long and tedious, but I am pretty satisfied with the little melody I got. Maybe I might make it my new ringtone.
With that complete, I was ready to focus more on my final project, and I would start making progress toward turning my ideas into prototypes and, eventually, a reality.
miscellaneous
Along with the main assignment for this week (see above), I also did some unrelated work to keep progressing with the course, such as more work with the final project and this website.
final project thoughts
I kept on working on my final project in the meantime. I started up with some more plans and designs for the actual implementation. I am still in the development and theoretical stage, but I am nearing the end of this, and will soon start working with actual prototypes and models to implement what I have been theorizing for a while. More detailed and thorough progress on my final project documentation can be found in the final project tab.
more website updating
Along with work on the final project, I also worked on finishing up the major updates to the website. I had fallen a little bit behind when I first started overhauling the website, and completely updating and catching up was a slightly daunting task, so I split up the work a little bit. I did, however, intend on making the final push this week with updating the pages and catching up with any assignment that I had either missed or left incomplete. My results can be viewed anywhere on this website. Overall, there is still a little bit more work to be done with completely updating everything, but it is all basically already complete.
With that out of the way, the vast majority of the website work is completed, and I am well on my way with the final project.
This has been an educational and overall productive week, and I look forward to next week, where I get to delve more deeply into my final project, and where we get to look at networking.
final message: 10 august, 2020
As of 10 August, 2020 (the publishing of this final bit), all documentation of this website has been finalized, and no further documentation will be added to this website. No additional photos, videos, code snippets, models, or commentary will be posted to this site. This website is meant to serve as the documentation of my learning during the Introduction to Digital Fabrication (PHYS S-12) course during Harvard Summer School 2020, and the program officially ended on 10 August. Thus, this website will no longer be edited and nothing will be added to it. This is why my biographical information may no longer be accurate at the time of reading of this page. It has been a fun run, but sadly, the course is over, and thus my documentation is also complete. Thank you to anyone and everyone who helped me along the way, and I am excited for future endeavors!