03: electronics and tools
introduction
This page details what I learned with class 2, held on 30 June, 2020. This is where we all got more acquainted with the tools in our kit, and where we actually started working with the tools in our kits. This would be the first true exploration of what was in our kit and how to use it, as well as a brief introduction to Arduino, a programming language that would help us program the boards we had to do what we want them to do, something extremely useful for the final project.
the kit comes!
The kit had finally managed to arrive, thanks to Rob's and Nathan's perseverence in the face of uncertainty! I had technically gotten my kit the afternoon before, but I barely had enough time to even open up the kit by that point, so today it was!
Now, onto the class info!
kit components
Here, I will talk a little bit about what was in the kit, and how those components can work together to produce simple machines that can do really interesting things. With my new kit finally here, I was ready to put it to use.
what's in the kit?
Here, there will be a brief description of what is in the kit, though more thorough information and a more detailed list can be found here.
bag 1: passive electric components
As the name suggests, this bag contains passive components, such as resistors, diodes, a potentiometer, capacitors, and buttons. The resistors' resistances range from 100 Ω (Ohms) to 10 million Ω, and we have two capacitors of capacitances 10 μF and 10 pF. The buttons are simple pushbuttons.
bag 2: sensors
This bag contains various sensors, such as phototransistors (both visible and IR), a thermistor, an accelerometer, and a piezo disc. It also contains some other modules, such as the Adafruit microphone module, along with Hall and copper tape. More detailed info can be found in the link above.
bag 3: output devices
This bag contains mainly devices that can provide some sort of output, such as a buzzer, LEDs (both visible and IR), and a cathode. the LEDs come individually and in strips, and come in various colors for visible light.
bag 4: motors
This bag contains, as the name suggests, motors (I'm starting to see a pattern here with the name of the bag and what's inside...). There's a servomoter, a stepper motor, a DC motor, and a micromotor. Two of these motors will come in a box separately from the bag, but are grouped with the contents of the bag.
bag 5: boards
This bag contains the electic circuit boards (not to be confused with the breadboards, though there were two breadboards in this bag for my kit as an anomaly). There is an Adafruit Metro M0 board, and a Huzzah ESP32 board, both of which only take 3.3V inputs. These are the boards that we will mainly be using to code and power our final projects.
bag 6: power
This bag contains anything that can power our contraptions. It contains various batteries, a power bank, and a soldered power supply connector. More details about the voltages for the batteries and what they can be used for can be found, as always, in the link listed above.
bag 7: connections
This bag is reserved for any type of connections that need to be made, which includes wires to wire our circuits, mini-hooks, USB cables, and breadboards. It is important to note that some of the USB cables are power-only, while others provide both power and control (this is something I end up overlooking in future classes, which leads me into some serious problems with working my Arduino board).
bag 8: mechanical components
This bag contains some mechanical hardware that we can theoretically use as part of our projects, in the event that we do not have access to much of this hardware at home. It contains screws (for steppers), bearings, washers, nuts, magnets, wheels, motor brackets, string, and micromotor adapter parts. Some of these parts are actually 3D-printed, and supplied by Harvard itself (pretty neat if you ask me).
tools not in a bag + protection
Finally, there are some tools that do not fit into any of these bags that are also extremely valuable. There is a caliper, hex keys, a wirestripper, a digital multimeter, and a screwdriver. More specifics about the hex keys can be found in the tab above. As always, of course, there are included safety glasses, to make sure that we don't ruin our eyeballs whilst playing (unsupervised) with equipment we've never used before.
Again, more detailed descriptions of the components and where they can be bought can be found in the link highlighted earlier in this tab. With these tools, it was time to create.
how do these components work?
These components are quite simple to use and can be put together quite easily without much soldering or other electrical/mechanical work. This is great, as this year, we unfortunately do not have access to the actual FabLab at Harvard due to a certain disease that shall remain nameless. Nevertheless, we would soon learn how to use the equipment we were provided in the kit to create interesting contraptions and prototypes.
what can these be useful for?
The components of this kit, as stated before, will make up the bulk of what we will be using for our final projects (especially the boards). The final project will involved creating something with these components, and thus it will be important to learn how to use them and how to create things that yield results from them. We will work a little bit with the physical hardware (such as when we learn how circuits work and how to wire them in specific ways), but the bulk of our attention will go to working with the boards and learning how to program them to provide specific outputs with given (and specific) inputs.
With the basics of what's in the kit sorted out, we were ready to start putting things together and wiring some basic circuits in the breakout rooms, and at home.
breakout rooms: basic circuits
During the breakout rooms for this class, we focused mainly on getting better acquainted with the items in our kit, as well as beginning to put them together into very basic circuits that could simply provide some form of output. This would continue into our homework assignment, where we simply needed to wire a simple circuit that did literally anything.
assignment
As explained above, we were supposed to wire a circuit for this assignment. We were also tasked with using a potentiometer and measuring the current flow through the circuit with our digital multimeter.
Overall, I reviewed a lot with wiring circuits, and was able to get a lot of practice with how to work with the components in the kit. This would come in real handy later on, as I understood that I would need to make more complicated circuits to do more complicated things, and I would eventually have to program in Arduino.
wiring the circuit
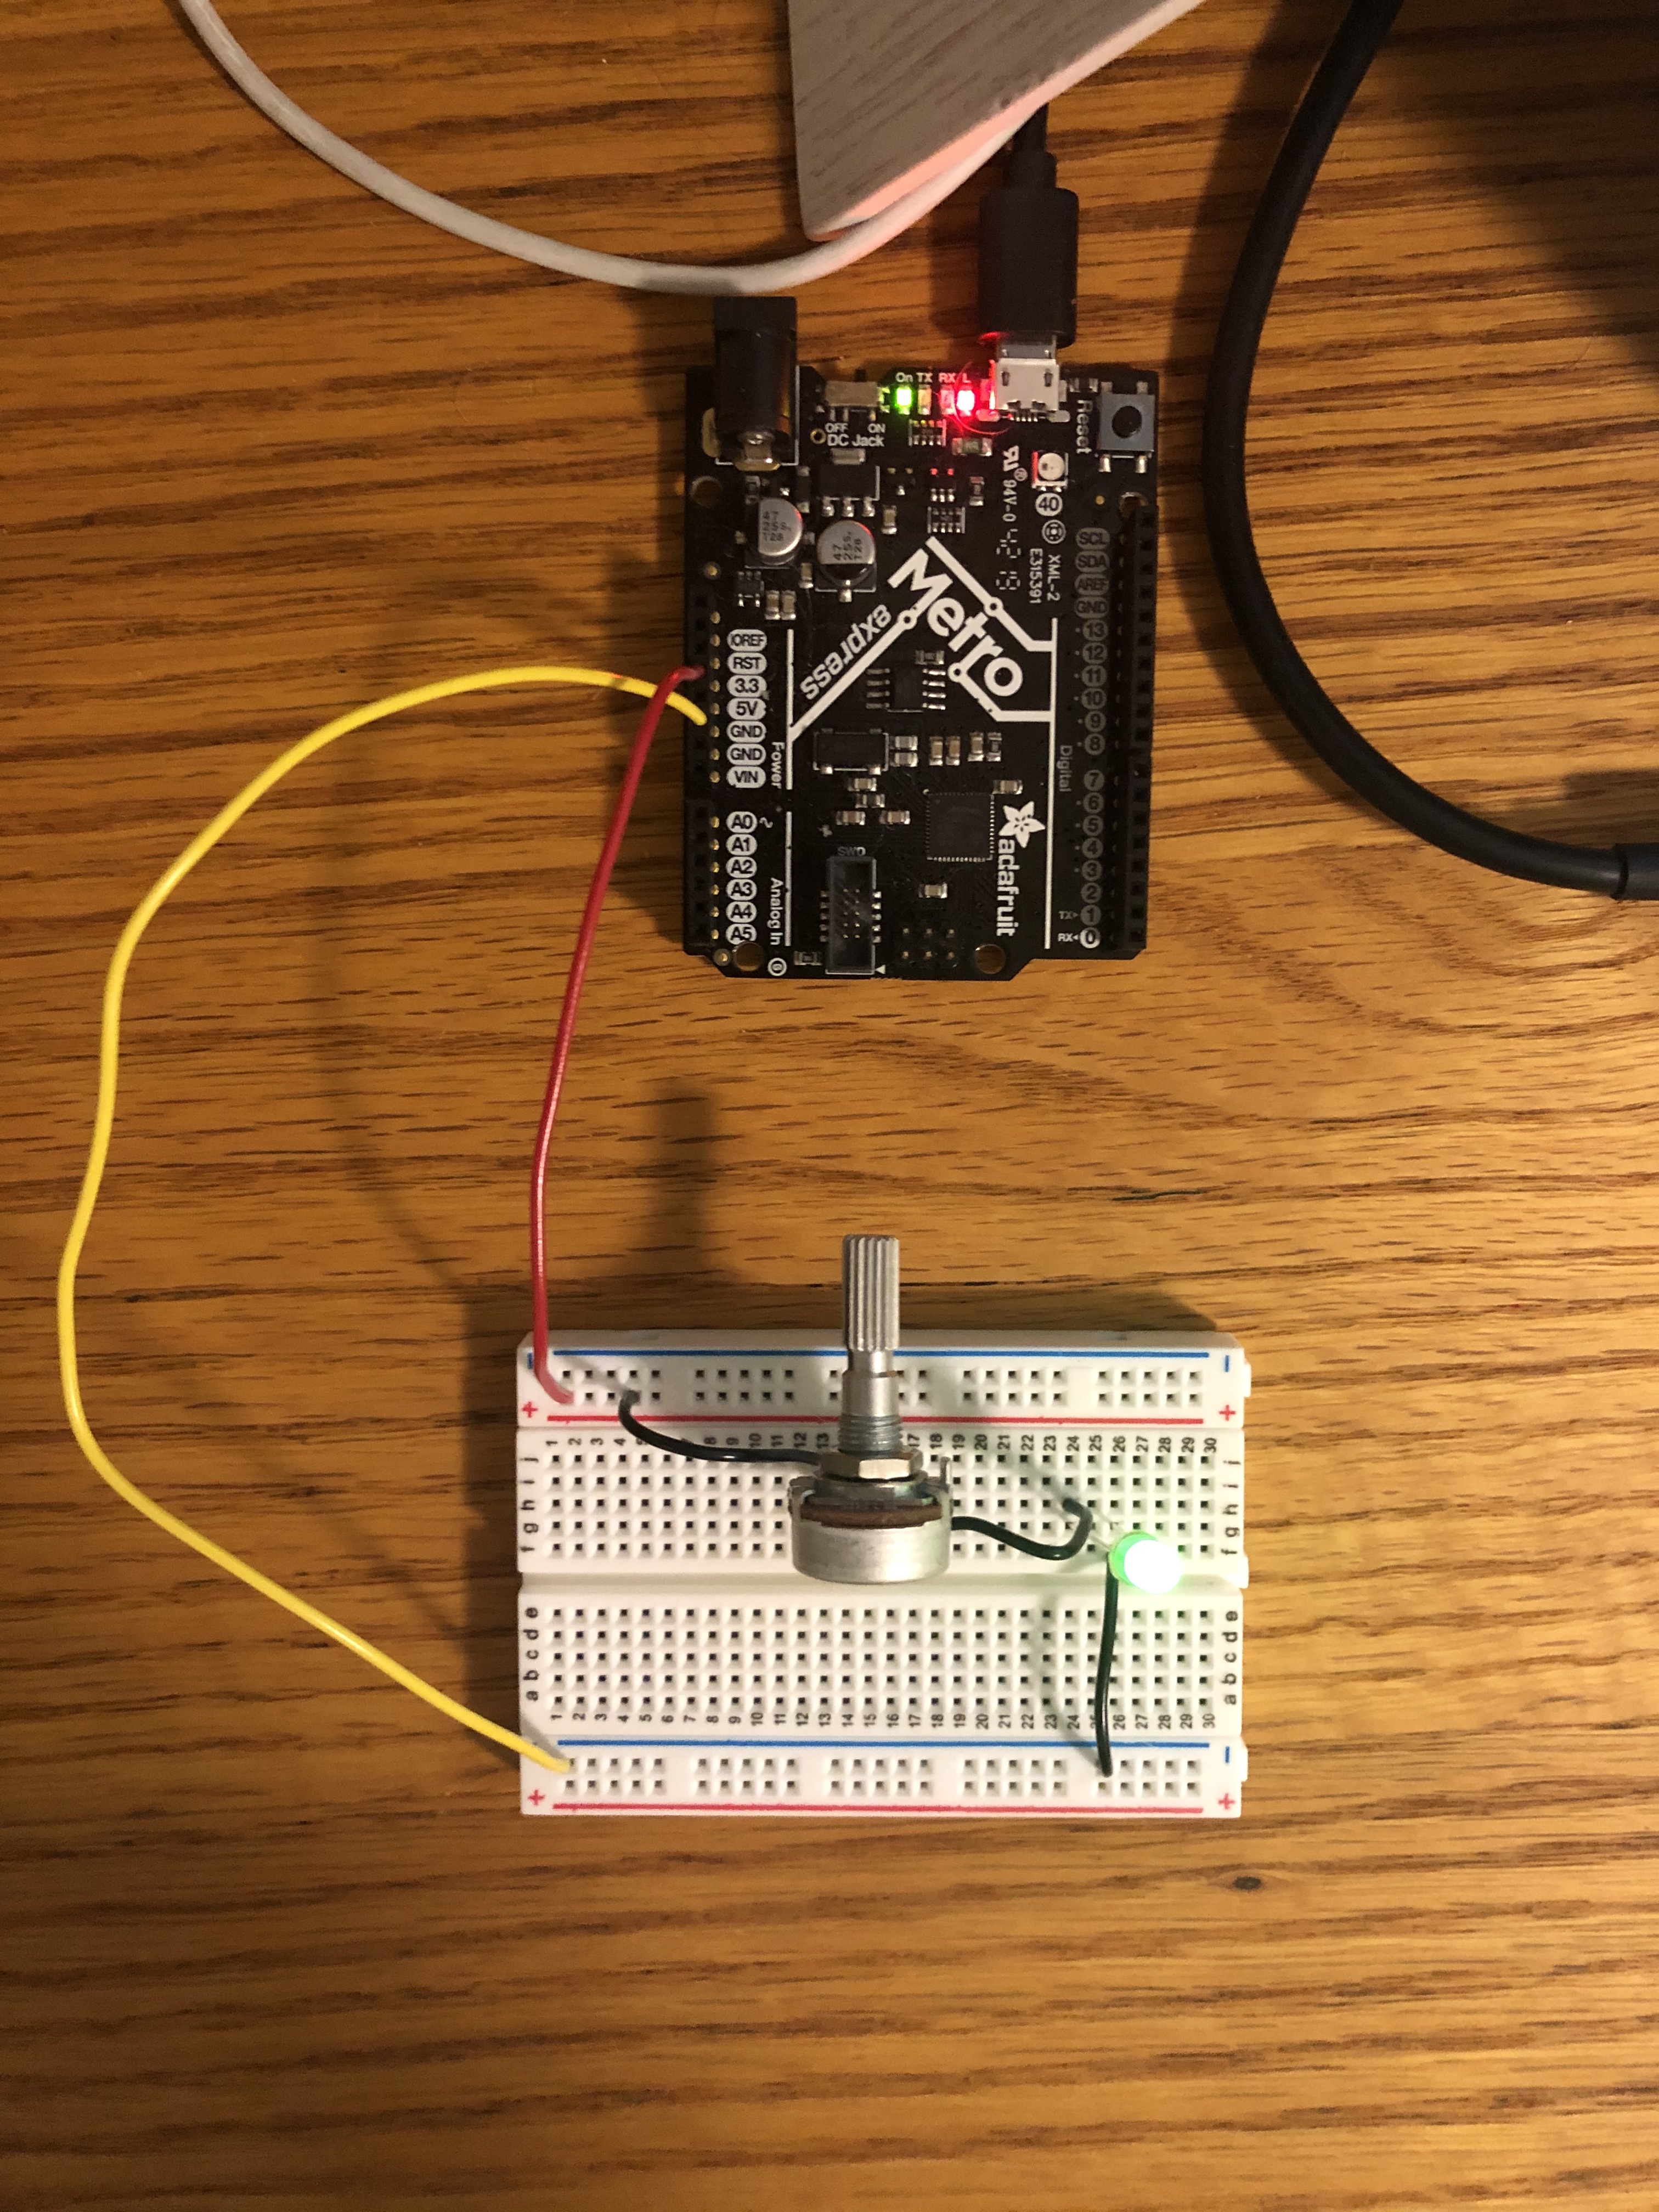
Here, I wired up a very simple circuit to control the brightness of an LED with a potentiometer.
the circuit
Below is a photo of the actual wiring of the circuit, along with a video showing the circuit in action. I used a simple green LED, a potentiometer, a breadboard, the Metro M0 Express Arduino board, and a few wires to make this happen.
Here is the video as a link in case the embedded player does not work.
measuring current and voltage
I measured the current through the LED then with the digital multimeter provided in the kit. It read out a value rather close to 3.3V (3.27 V), so I am led to believe that this was either due to slight inaccuracy in the multimeter or due to the resistance through the potentiometer not being exactly 0 Ω, though it could be my human error as well.
Then, using Ohm's Law V = IR, we get that I = V/R = (2.27 V)/(71.8 Ω) = 0.031 A.
The currents were now successfully measured, and Ohm's Law was confirmed when I double-checked the values I got.
And thus this assignment was complete. Throughout working on making this circuit and measuring current through it, I learned a lot about how to actually make these circuits work. I hadn't used a breadboard since I completed an in-person lab during my physics course at Harvard Extension School earlier this year, so relearning that was quite interesting. I also got some decent practice with Ohm's Law, and I actually understood the practical application and significance of it.
final message: 10 august, 2020
As of 10 August, 2020 (the publishing of this final bit), all documentation of this website has been finalized, and no further documentation will be added to this website. No additional photos, videos, code snippets, models, or commentary will be posted to this site. This website is meant to serve as the documentation of my learning during the Introduction to Digital Fabrication (PHYS S-12) course during Harvard Summer School 2020, and the program officially ended on 10 August. Thus, this website will no longer be edited and nothing will be added to it. This is why my biographical information may no longer be accurate at the time of reading of this page. It has been a fun run, but sadly, the course is over, and thus my documentation is also complete. Thank you to anyone and everyone who helped me along the way, and I am excited for future endeavors!